Microsoft Defender AntiVirus – Real-Time Protection cannot be re-enabled

Two posts in as many hours after a huge hiatus… :-S

Before reinstalling Windows yesterday, I turned off Real-Time Protection in Defender to perhaps speed the install process up a touch (LOL). After everything was updated, I was unable to turn it back on – it informed me I was “using other antivirus providers”!

I wondered if it was because I’d previously uninstalled the rather odd Microsoft Defender for Individuals thingy. I reinstalled it and it moaned that Defender’s real-time scanning was off, so I clicked on its prompt which opened the Security Center which then insisted my administrator (i.e. me) had disabled some settings!

I’ve never turned off such stuff in policy but I obediently checked the various Policies registry keys and all was well.

Next I put MalwareBytes back on; activated its trial so I could select to register it with Security Center; confirmed this had registered; and then unregistered it from there again before disabling the trial mode once more. Still no joy.

The main “Virus & Threat Protection” page in Security Center showed no problems, but note it has a less than obvious feature, highlighted below:

That showed the following:

Similarly, the Get-MpComputerStatus PowerShell cmdlet showed that Defender was running in “SxS Passive Mode“.

As per various onine suggestions, I tried to fix any possible WMI Repository corruption with:
winmgmt.exe /salvagerepository
But that found no issues. I was not willing to perform a /resetrepository as that can have quite a bit of fall-out.

Another command I tried which was referenced online was:
“c:\Program Files\Windows Defender\mpcmdrun.exe” -wdenable
It did not help either.

Then I remembered I had a few months ago tried a reinstall of SUPERAntiSpyware – an app which always struck me as a bit of an oddity, but which was a tool I had seen referenced more than once as something to use to be able to scan your machine with an alternate AV engine from time to time. I had uninstalled it a few minutes after installing it back then and didn’t really want to stick it back on. Fortunately, their site had a specialist Uninstall tool for it. I ran that and rebooted and the problem was fixed! :-D

WinSxS and High CPU after Updating

My older Windows 10 PC (around 7 years old) has recently been often having a weird issue where shortly after booting, the mouse would become hugely laggy and the PC really unresponsive. It would last maybe 30 minutes or more and then settle down. Looking in Task Manager, TiWorker.exe (Windows Modules Installer Worker) in particular would be very busy but other unrelated processes would seem busier than usual too. I assume the system was completing applying either normal Windows Updates or Defender Definitions Updates.

I tried all the usual recommended fixes:

  • Disk Cleanup wizard.
  • DISM.exe /online /cleanup-image /restorehealth
    (This re-triggered the huge slowdown but completed successfully eventually.)
  • SFC.exe /scannow
  • Windows Update Troubleshooter
  • Removing c:\Windows\SoftwareDistribution\ and c:\Windows\System32\CatRoot2\
    (Requires stopping “Windows Update” and “Cryptographic Services” services first.)

The problem would, unfortunately, soon come back with varying rapidity.

I wondered if the high disk activity from the normal updating process was showing up a pending failure in my old SSD and generating loads of hardware interrupts or something casusing such an extreme slowdown. (I saw similar problems in the past on old Dell Optiplexes with faulty CD-ROM drives causing multiple processes to eat CPU). There were no disk-related Event Log errors; benchmarking of the SSD appeared fine; its software insisted all was OK; and Latency Monitor wasn’t giving me any obvious clues.

Yesterday, I managed to get Resource Monitor running while the problem was occurring and I noticed a lot of disk activity from TiWorker.exe on subfolders in c:\Windows\WinSxS\Temp\InFlight\ - a location new to me.

My WinSxS folder contained nearly 16,000 immediate child subfolders. It’s famously a folder not to play around in or delete things from – its massive size encourages people to fiddle! The existence of a subfolder there called “Temp” though piqued my interest. It contains subfolders called “PendingDeletes” and “PendingRenames” which I imagine are self-explanatory, but the InFlight one less so. My InFlight folder tree contained over 105,000 subfolders but only 30 actual files! This seemed crazy for a folder under something called “Temp”…

Interestingly, some things I read suggested that running DISM to try and fix such issues could just add yet more subfolders each time. Judging by some of the folder dates, I could well see that as having been being the case – with over 1000 being added on just one day around the same time.

There are some other references online to a busy InFlight folder causing updating slowdowns with most advice saying do not touch but none of it looking to be saying that from a position of definitive knowledge as to exactly why those subfolders (even when empty) might be required, or what they even do. I found one guy saying he’d actually deleted them to fix the problem with no apparent ill-effect.

I contemplated deleting them too but ultimately chickened-out and decided to do an in-place Windows install from a mounted 22H2 ISO instead. Afterwards, I checked, and the new InFlight folder contained around 300 subfolders. :-)

Since then, I’ve installed various post-ISO cumulative updates etc. My main WinSxS folder now contains over 20,000 folders (plenty more than before!) but my InFlight folder is now empty! And I’ve not even done a Disk Cleanup yet…

I would love to hear anyone else’s experiences with this folder and slow updates! I hope sharing this journey proves useful to others.

Close Run Advertised Programs Window

Still having an old SCCM 2007 server managing some desktops, I came across an interesting problem this week with the “Run Advertised Programs” Control Panel applet.  I’ll call it RAP from here-on!  It’s not a feature we ever made use of, preferring the completely silent automated approach, but wanted to try it this week for something specific.

There’s an app where we needed the user to control when it installed, so this made for an easy solution.  Except trying to get users to find the RAP icon (especially with their having to find the Control Panel and then switch out of Category View first), we decided to simplify things by throwing an icon on the Desktop to it on the machines that we’ll target for this app and then the installation will remove that shortcut afterwards.

I noticed that when the user starts off the download and install from within RAP, they get no on-screen notification that it’s completed, and the main RAP window does not update the “Last Run Time” and “Last Status” fields unless you close and re-open it.  So I thought a simple solution would be to get the installer batch file to close the RAP window to help signify completion rather than having to start faffing with pop-up message boxes (which no one ever reads).  Except it wasn’t actually that simple…

First off, being a Control Panel applet, RAP is a .cpl file and only appears in the process list as an instance of rundll32.exe.  You can’t just close those at random without knowing which is the one you want.  The apparent answer came from a search online.  You can use tasklist.exe to find RAP’s Module (SMSRAP.cpl), limiting its search to rundll32.exe instances using the filter argument:

tasklist.exe /M SMSRAP.cpl /FI "IMAGENAME eq rundll32.exe"

1-Tasklist-x86

Then knowing the Process ID (PID), from there you can go on to close that process.  Most of our kit is 64-bit Windows 10, and here is the output on that OS:

2-Tasklist-x64

The first place to visit to see what was going on was Sysinternals Process Explorer:

3-ProcExp-Standard-x64

Here you can see the rundll32.exe instance containing modules that include the relevant SCCM client components.  The complication of using the SCCM 2007 Client is that it is 32-bit.  You can see from the above that these modules are associated with a 32-bit instance of rundll32.exe whose parent process is a 64-bit instance of the same.

Next thing was to try a similar approach in PowerShell.  Get-Process has a -Module parameter that lists the modules loaded in a process. For simplified output, I’ve determined the Process ID beforehand.  Here’s the result on a 32-bit Windows 7 OS while RAP is open:

Get-Process -Id 6872 -Module

4-GetProcess-x86

That shows an extensive list of modules which did include all the SCCM related ones. Here’s the equivalent on a 64-bit Windows 10 OS:

5-GetProcess-x64

That’s a very short list and is missing the SCCM components and almost everything else too.  That explains why the tasklist.exe method wasn’t working either.  The DLLs it does include though are telling – of the five listed, three are directly related to WoW64 which is the Windows-on-Windows subsystem that presents a 32-bit environment that allows 32-bit code to run on a 64-bit machine.

Back to Process Explorer, here is a closer look at the loaded modules on the 64-bit machine, this time with the bitness (“Image Type”) column added:

6-ProcExp-Bitnesses-x64

Ordered by bitness, we see the only 64-bit modules in that 32-bit rundll32.exe process are the ones we could see from PowerShell.  So in essence, the problem is that the 32-bit modules – which includes the RAP files, are invisible to the 64-bit techniques we are using.  Now there are ways around it using other tools – there are references online to using Sysinternals ListDlls.exe for example.  I wanted to stay native though.

I decided the easiest thing to do would be to call the 32-bit version of PowerShell and pass it a command.  Here’s example code that queries a specific process (by ID) and returns the modules – filtered to just the ones with “ccm” in their name.  Note I’m using the simplified Where-Object syntax that appeared first in PowerShell v3 in this example:

c:\Windows\SysWOW64\WindowsPowerShell\v1.0\PowerShell.exe -ExecutionPolicy Bypass -Command "Get-Process -Id 8172 -Module | Where FileName -like '*ccm*'"

7-Solution

As you can see, that now means we can get visiblity of these modules.  Coming back to using this in practice in an install script, we wouldn’t know the process ID in advance.
Here then is an example command to call the 32-bit PowerShell instance that locates the rundll32.exe instance that RAP is running in and then closes it.  SUCCESS!

c:\Windows\SysWOW64\WindowsPowerShell\v1.0\PowerShell.exe -NoProfile -ExecutionPolicy Bypass -Command "Get-Process -Name Rundll32 -ErrorAction SilentlyContinue | Where-Object {$_.Modules.ModuleName -contains 'SMSRAP.cpl' } | Stop-Process -Force"

The -ErrorAction SilentlyContinue on Get-Process prevents errors if there are no instances of rundll32 at all.

$_.Modules gets the modules property of the current process in the pipeline coming from Get-Process.  If you look with Get-Member, you will see this property is of type System.Diagnostics.ProcessModuleCollection and corresponds to the list of Modules seen in the previous screenshot.  If you pipe the contents of that property to Get-Member, you will find that the collection is composed of objects of type System.Diagnostics.ProcessModule.  We need to be able to filter on the ModuleName property of these objects to find “SMSRAP.cpl”.

Since PowerShell v3, it’s been possible to do this easily thanks to the ability to retrieve a particular property of the members of a collection using Member Enumeration syntax.  In this case, $_.Modules.ModuleName returns an array containing just the ModuleName properties of each item in the collection held in the Modules property of the process.  It’s equivalent to doing ($_.Modules | Select-Object -ExpandProperty ModuleName) which would be be the PowerShell v2-compatible way of doing it!

Note also the use of the -contains operator to see if the collection on the left of the operator contains the value on the right.  There’s also exists a -notcontains operator.  Incidentally, PowerShell v3 also saw the introduction of the complementary -in and -notin operators which work the same way but expect the value on the left and the collection on the right.

Caching Issue with Fileshares

I came across a frustrating but ultimately interesting Windows 10 problem recently…

I have a script for making that user accounts that also makes a new user homefolder via a UNC path and then sets appropriate permissions on it.  Unfortunately, recently I started getting errors saying that the path was not available when I was trying to Get-Acl it.  I added in a Test-Path before the Get-Acl to ensure it was returning $true before I tried doing anything to the ACL but it would still fail more often than not!

I confirmed that when using a local path on my machine, all was well.  The homefolders are spread over more than one server using DFS so I tried evaluating the DFS Targets and referring to their actual UNC paths instead of a DFS UNC in case this was a quirk to do with DFS – no improvement.

I knew the folder must eventually appear so I added a workaround:

do {
	Start-Sleep -Seconds 1
} until (Test-Path -Path "FileSystem::$homeDir" -PathType Container)

Since an initial Test-Path would see the folder, this ensured a minimum of a one second pause to allow for things to go weird.  The folder now consistently reappears after 5 or 6 seconds!

I wrote a little test to see just how quickly the folder was becoming invisible to Test-Path by testing it repeatedly:

New-Item -Path "FileSystem::$homeDir" -ItemType Directory | Out-Null

$start = Get-Date
do {
	$millis = ((Get-Date) - $start).TotalMilliseconds -as [int]
	$test = (Test-Path -Path "FileSystem::$homeDir" -PathType Container)
	Write-Host ('{0}ms = {1}' -f $millis, $test)
} until (($test -eq $true) -and ($millis -gt 20000))

$dACL = Get-Acl -Path "FileSystem::$homeDir"

This showed exactly what was going on

CachingFixTrueThenFalse

I gave up fighting this for a few weeks and stuck with my workaround.  It was even odder because the problem had not always been present (I excluded our Antivirus as the cause).

We then came across an issue at work where a couple of systems we use were having hanging issues with some new Windows 10 b1803 machines.  Both systems made use of UNC paths filled with tens of thousands of files, running on Server 2012 R2 or newer and had been fine on Windows 10 b1709 and Windows 7.  Some Googling around found other people with similar issues, fixed by turning off some SMB2 client caches.

There’s also a Microsoft KB article here.  Some posts I’d found were recommending turning off all three caches, others just the Directory one.  I confirmed this fix would work for the affected apps though I’ve only deployed it to specific machines.

reg add HKLM\SYSTEM\CurrentControlSet\Services\LanmanWorkstation\Parameters /v DirectoryCacheLifetime /t REG_DWORD /d 0 /f >nul
reg add HKLM\SYSTEM\CurrentControlSet\Services\LanmanWorkstation\Parameters /v FileInfoCacheLifetime /t REG_DWORD /d 0 /f >nul
reg add HKLM\SYSTEM\CurrentControlSet\Services\LanmanWorkstation\Parameters /v FileNotFoundCacheLifetime /t REG_DWORD /d 0 /f >nul


You can see where this is going…  I wondered whether this same feature might be related to the problems I was seeing (despite my PC being on build 1903).  I’ve disabled all three caches (I’ve not taken the time to test them individually) on my PC and sure enough, the problem has gone – the folder remains visible to Test-Path at all times and Get-Acl no longer complains about a missing network path!

Windows 10 Upgrade Blocked

Tags

On trying to upgrade a PC to Windows 10 build 1903 I received the following error:

1903UpgradeBlock

There is a link to the following article: KB4500988

The underlying problem is the presence of a USB mass storage device – in this case, a USB Flash Drive acting as a Bitlocker Startup key.  In the absence of a fix from Microsoft yet, the only obvious option would be to disable Bitlocker.  I wasn’t willing to decrypt the entire PC just to upgrade.

My solution was to use PowerShell to add an extra key protector based on a Password.  That way, the PC can be started using a password instead of the USB startup key.  If, like me, you’re not used to using Bitlocker cmdlets, have no fear, PowerShell makes things easy to work out:

Firstly, confirm the name of the module containing Bitlocker cmdlets:
1903-BL1

Then check what cmdlets are in it:
1903-BL2

And a quick way to check the syntax of the likely cmdlet, Add-BitlockerKeyProtector:
1903-BL3
So the syntax overload we want is the one with the -PasswordProtector parameter which takes a SecureString in the -Password parameter.  We can construct one easily from plaintext:
1903-BL4

Now the PC can be booted without the USB stick in it.

After upgrading Windows, to remove the KeyProtector, we can use the Remove-BitlockerKeyProtector cmdlet:
1903-BL5
As you can see, that requires a KeyProtectorId string.  I tried “password” but that didn’t work.  The Get-BitlockerVolume cmdlet includes a multivalued property called KeyProtector.  I had a closer look:
1903-BL6

I cheated and copied and pasted the ID:
1903-BL7

Of course I could have let PowerShell find it for me:
1903-BL8

Setting SCCM OSD OU by DP – Revisited

Further to yesterday’s post on this subject, I’ve seen some material online where I discovered there was a Task Sequence variable which can be used to take some of the guess work out of things.

It’s called _SMSTSBootImageID and it contains the Package ID of the Boot Image used to boot into Windows PE.  As a result, it’s not necessary to search through all the variables for those which have values that contain a package ID by means of a wildcard search.  Indeed, it’s no longer even required to parse all the variables at all.

Continuing on from previously, where $vars contains an object collection of the Task Sequence variables with Name and Value properties, here’s a list of those containing the SMS site code.  Here I’m using the simpler Where-Object filter format which can filter on a single property without reference to $_ or $PSItem and without enclosing the filter script in a scriptblock { … }:

TSEnv-10-SiteVars

Notice the three _SMSTSHTTP variables; one of them contains a Package ID in its name which matches the value of the _SMSTSBootImageID variable.  In a bare-metal situation, we can be sure this variable will be present as the boot image will have to have been downloaded.  That then is the variable whose value we will use to obtain the Distribution Point’s fully qualified hostname.  Once again, I’ll use string substitution and a sub-expression:

TSEnv-11-ObtainURL

In the previous post, I extracted the hostname from the URL using some .NET methods to search through the string for forward slashes.  I realised afterwards it would have been easier to Split the string on the slashes.  Here is the result if we split using the PowerShell -split operator:

TSEnv-12-SplitResults

As you can see the third value is the one we went.  The second, empty, value is the zero-length string between the adjacent forward slashes in http://.  Here’s how we extract it.  Arrays are zero-indexed, so the third item is number 2:

TSEnv-13-Splitted

Please beware that the -split operator uses Regular Expressions, so if you try splitting on what they consider to be special characters such as “.” or “\”, you will get unexpected results.  For example, the backslash is the escape character, so to split on it you would need to escape it itself by splitting on “\\”.

For ease of reading and comprehension, breaking the script over a number of lines can make things clearer, but sometimes, one liners are more satisfying:

TSEnv-14-FinalOperator

That operator doesn’t look tidy (!) in there. so you could use the .NET String Split() method instead.  This is in some ways easier as it doesn’t use Regular Expressions, but beware, it is case-sensitive!

TSEnv-15-FinalNET

Speaking of case, you might want to add a .ToUpper() or .ToLower() to the end of this to make your URL matching definitely incapable of being tripped up by case.

The final PowerShell script is much shorter than the one in the previous post:

$TSEnv = New-Object -ComObject 'Microsoft.SMS.TSEnvironment'
try {
    $TSEnv.Value('DPName') = $TSEnv.Value("_SMSTSHTTP$($TSEnv.Value('_SMSTSBootImageID'))").Split('/')[2].ToLower()
} catch {
    $TSEnv.Value('DPName') = 'ERROR'
}


Setting SCCM OSD Computer OU by DP

Tags

, ,

There is a part two to this post here.

I’m currently involved with the setting up of a new SCCM Site that spans a number of physical sites.  Each site will have at least one Distribution Point (DP).  During Operating System Deployment (OSD), we wanted to be able to put the new computer account into a specific OU depending on its location.

One way of doing this I was shown would be a script in the Task Sequence that looks at the Default Gateway of the computer and then sets the OU based on that.  Unfortunately this would mean many entries for all our subnets and it would take a lot of maintenance.

Another possibility could be to let the computer account be created in a default OU and then use a script later in the Task Sequence – after the computer becomes domain-joined – to move it to a final OU location based on the AD Site detected.

Instead I found a way to determine the Distribution Point involved in OSD at the start of the Task Sequence and then use that to set the Target OU for the domain join step.

As is usually the case, I decided to tackle this with PowerShell, so first the Boot Image had to have the PowerShell and .NET components added to it and the F8 command prompt feature needed to be enabled too (a checkbox).  Once done, I PXE booted a new VM; started the OSD going; pressed F8 to get a CMD window up; and typed “PowerShell” to change the CMD console into a PowerShell console.
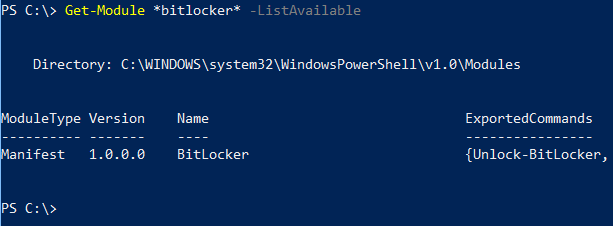
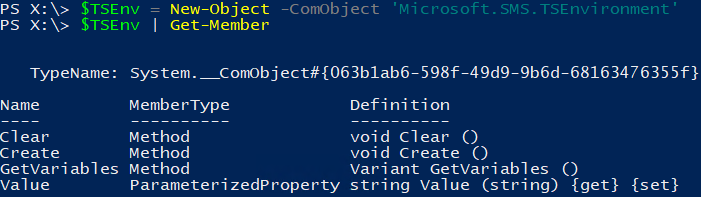
My intention was to have a look to see what Task Sequence variables were present at this early stage of OSD to see if any referenced the DP hostname.  A quick look online showed that to read and write Task Sequence variables, you need to use the COM Object “Microsoft.SMS.TSEnvironment“.  A COM Object is instantiated by the -ComObject parameter on the New-Object cmdlet.  Once instantiated, you can of course pipe it to Get-Member to get an idea of what it can do:

TSEnv-01-Members

Not much to see there.  Let’s have a look at the GetVariables() method and see what Type of objects the variables actually are:

TSEnv-02-VarsCount

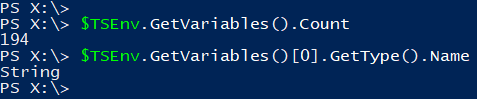
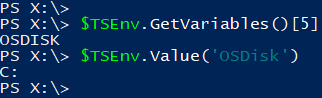
As you can see, a whopping 194 variables were present – surely the Distribution Point name has to be in there somewhere.  Looking at the first variable returned shows it to be of Type [String].  You can access the name of one by its numerical index and then query the associated Value using the Value() method we saw above:

TSEnv-03-Value

To get those variables into a form you can easily look through or filter in some way, you can turn them into a collection of Objects with a Name property set to the variable name and a Value property obtained by using the Value() method.  This is easily done by creating Hashtables using @{} and then casting them to PSCustomObjects, one for each variable name present in the collection.

$TSEnv = New-Object -ComObject 'Microsoft.SMS.TSEnvironment'
$vars = $TSEnv.GetVariables() | ForEach-Object {
	[pscustomobject]@{
		Name = $_
		Value = $TSEnv.Value($_)
	}
}

I entered the script on one line (which requires semi-colons between Hashtable elements) and then selected the first 25 values:

TSEnv-04-VarsList

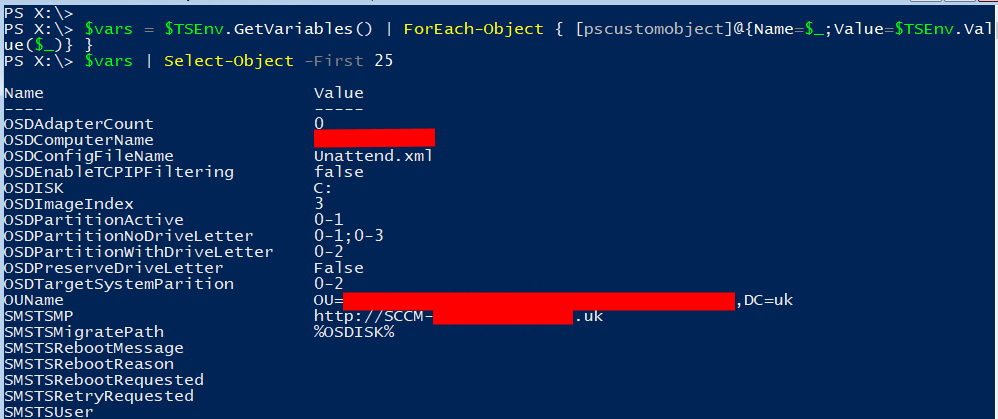
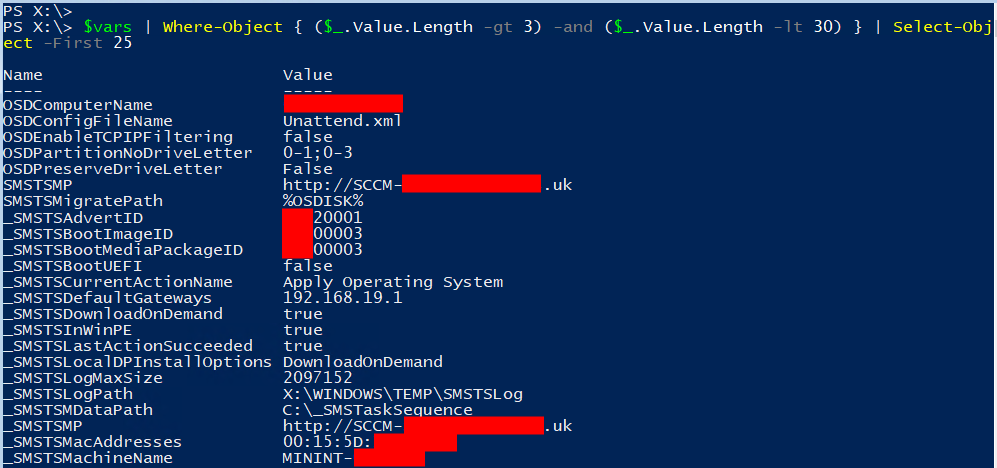
You soon find that a lot of values are empty, or are very short or (as I saw later in the list are very long).  With the variables all now a collection of objects, it’s easy to filter them to ones that might be of interest by looking at the length of the variable’s value property:

$vars |	Where-Object { ($_.Value.Length -gt 3) -and ($_.Value.Length -lt 30) } | Select-Object -First 25<span id="mce_SELREST_start" style="overflow:hidden;line-height:0;"></span>

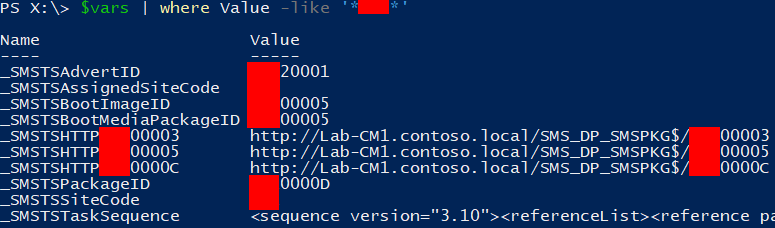
This gives more interesting values (note the Default Gateway I mentioned earlier).  There’s also a variable called _SMSTSMP which is the Management Point:

TSEnv-05-VarsCandidates

I did eventually spot a whole group of variables whose value included a URL on the Distribution Point.  These variable names all included the ID of a Package in them (and in the value URLs).  Here is an example one.  The name is in the form _SMSTSHTTPxxxnnnnn where xxxnnnn is the Package ID, of which xxx is the SCCM Site Code:

TSEnv-06-DPString

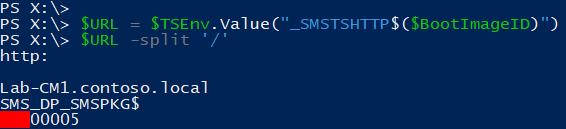
Armed with this information, it’s now straightforward to slice out the DP’s hostname from one of these values using some .NET string methods and then put it into a new variable to return.  In the unlikely event that something should go wrong, I’ll return the value “ERROR”.

param (
    [ValidateLength(3,3)]
    [string]$SiteCode = 'CC1'
)

$TSEnv = New-Object -ComObject 'Microsoft.SMS.TSEnvironment'
try {
    $allVars = $TSEnv.GetVariables() | ForEach-Object {
        [pscustomobject]@{
            Name = $_
            Value = $TSEnv.Value($_)
        }
    }
    $DPvalue = @($allVars | Where-Object { $_.Name -like "_SMSTSHTTP$($SiteCode)*" })[0].Value
    $startIndex = $DPValue.IndexOf('://') + 3
    $endIndex = $DPValue.IndexOf('/', $startIndex)
    $DPName = $DPvalue.Substring($startIndex, $endIndex-$startIndex)
    $TSEnv.Value('DPName') = $DPName
} catch {
    $TSEnv.Value('DPName') = 'ERROR'
}

I’ve added an optional SiteCode parameter (which is validated as being exactly 3 characters long) and for which I’ve added a default value for my own fictitious environment.

The relevant variable name is found by filtering the collection of constructed variable objects by looking for those whose name matches (i.e. are “-like“) _SMSTSHTTPxxx* where xxx is replaced by the $SiteCode variable by means of the Sub-Expression Operator $().  Note the need for double-quotes to allow this substitution to take place.  Since the result of the Where-Object cmdlet may or may not return more than one item, the filter is wrapped inside the array sub-expression @() to guarantee an array is created, even if it is only of one element.  That makes it safe to grab the first returned value by indexing into the array with [0].  Finally, it is necessary to get just the actual Value string property using the .Value at the end of the line!  If no variable names match, the line will throw an exception as the array will have no elements – the exception will be caught by the catch block.

Chopping out the DP name is simply a case of starting with the first character after the position of “://” in the string and then chopping up to the first “/” after this point.  Positions in the string are found using the IndexOf() method overloads on the .NET string class.  The first time I use it I give it just the string to look for but the second time I supply a second parameter which is the position at which to start searching (the first character being position 0).  Without that, the “/” would match the first one in http:// and not the one delineating the end of the hostname I’m trying to extract.  The substring is chopped out using the .NET SubString() method where you tell it which character to start at and how many characters you want.

The script ends by assigning the located value to a Task Sequence variable called “DPName”.  If any exception was caught, then the value “ERROR” is returned in the same variable which will later be used to set a default OU location rather than error.  Note that the instantiation of the COM Object was not protected by  the try{} block.  If that fails, I’d really like to know!

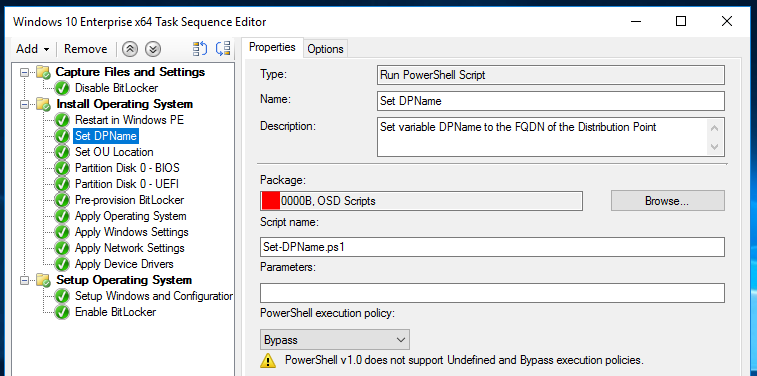
The code is then put into a program-less package, distributed to the PXE-capable DPs and then referenced at the top of the OSD Task Sequence as a “Run PowerShell Script” task.  (The following screenshots are from a lab setup.)  The script is not signed so I needed to tell it to Bypass the Execution Policy:

TSEnv-07-GetDPName

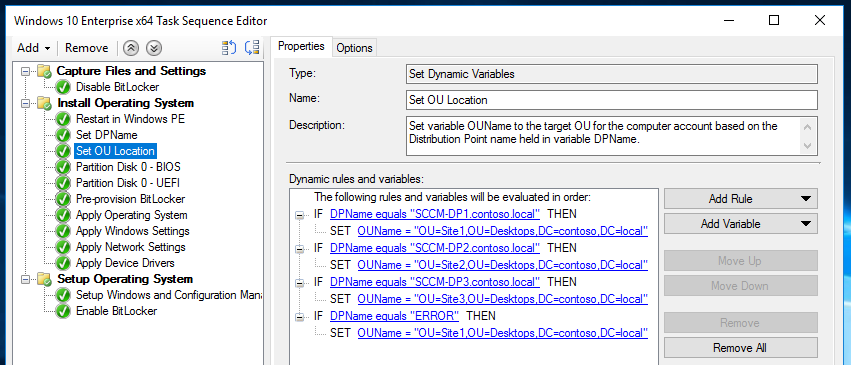
After this, you insert a “Set Dynamic Variables” task containing a number of “Add Rule – Task Sequence Variable” rules which compare the DPName variable the PowerShell script created with your known DP Fully Qualified Domain Names.  Under each match, you use the “Add Variable” button to make it create a new OUName variable with the Distinguished Name of the target OU you wish to use for the location that DP is in.  Note the final rule for if the script returned “ERROR” where you choose a default location:

TSEnv-08-SetOUName

Maintaining this list of DPs is far easier than a massive list of Default Gateways would be.  It also doesn’t require anyone to touch the PowerShell code.

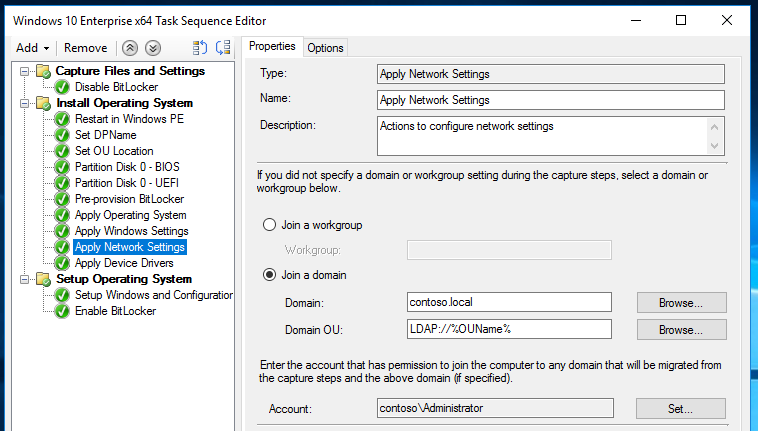
The final step is to pass the OUName variable to the Task Sequence step that configures how to join the machine to the domain.  This is the “Apply Networking Settings” step.  The variable name has to be inside % signs and preceded with the string “LDAP://”:

TSEnv-09-ApplyNW

And that’s it!

Subsequently, I found a much easier way of getting what I wanted in PowerShell.  Please see the follow-up post here.

Automated Java Uninstaller v2

If you’ve not read it, please read my original post on this subject before continuing.

The java uninstaller I posted works a treat most of the time, but not always.  We have a number of machines with Java v1.8 Update 74 on that refuse to uninstall it – even via Programs & Features the Windows installer progress box just sits there.

Process Explorer shows something interesting at this point:
Java Issue

The Windows Installer process, MsiExec.exe, has launched Java Web Start which has then opened a process called JP2Launcher.exe.  I’ve no idea what that is trying to do.  I tried a Fiddler trace of it and it caught nothing.  Whatever it is doing, killing the process allows the uninstall of Java to then continue successfully.

As a result, I’ve made an extended version of my Java Uninstaller script that will kill any instances of this process shortly after they appear.  Here it is:

Rem Remove all versions of Java x86 and x64

On Error Resume Next

Const HKEY_LOCAL_MACHINE = &H80000002
Const WINDOW_HIDDEN = 0
Const WAIT_ON_RETURN = True
Const wbemFlagReturnWhenComplete = 0

Const intJP2KillDelay = 5

Dim objSWbemServices

Set objWshShell = WScript.CreateObject("WScript.Shell")
Set objStdReg = GetObject("winmgmts:{impersonationLevel=impersonate}!\\.\root\default:StdRegProv")
Rem Need Debug privileges to terminate processes we do not own.
Set objSWbemServices = GetObject("winmgmts:{impersonationLevel=impersonate,(Debug)}!\\.\root\cimv2")

Rem MsiExec.exe sometimes launches JavaWS.exe which launches JP2Launcher.exe and blocks uninstall until the latter is killed.
Set objWMISink = WScript.CreateObject("WbemScripting.SWbemSink","SINK_")
strWQL = "SELECT * FROM __InstanceCreationEvent WITHIN 3 WHERE TargetInstance ISA 'Win32_Process' AND TargetInstance.Name = 'JP2Launcher.exe'"
objSWbemServices.ExecNotificationQueryAsync objWMISink, strWQL

For i = 1 To 2
	If i = 1 Then
		strKeyPath = "Software\Microsoft\Windows\CurrentVersion\Uninstall"
	Else
		strKeyPath = "Software\Wow6432Node\Microsoft\Windows\CurrentVersion\Uninstall"
	End If

	objStdReg.EnumKey HKEY_LOCAL_MACHINE, strKeyPath, arrSubKeys
	If Not IsNull(arrSubKeys) Then
		For Each strSubKey In arrSubKeys
			Rem Ensure is a GUID key
			If Left(strSubKey, 1) = "{" Then
				strSubKeyPath = strKeyPath & "\" & strSubKey
				objStdReg.GetStringValue HKEY_LOCAL_MACHINE, strSubKeyPath, "DisplayName", strDisplayName
				If Not IsNull(strDisplayName) Then
					intJavaIndex = InStr(LCase(strDisplayName), "java")
					If intJavaIndex > 0 Then
						intUpdateIndex = InStr(LCase(strDisplayName), "update")
						Rem Effectively make the check to be for "*java*update*"
						If intUpdateIndex > intJavaIndex Then
							strCmd = "MsiExec.exe /X " & strSubKey & " /quiet /norestart"
							intRC = objWshShell.Run(strCmd, WINDOW_HIDDEN, WAIT_ON_RETURN)
						End If
					End If
				End If
			End If
		Next
	End If
Next

objWMISink.Cancel
Set objWMISink = Nothing
WScript.Quit

Sub SINK_OnObjectReady(objNextObject, objWbemAsyncContext)
	Rem Kill JP2Launcher.exe processes after a delay (in case it's meant to launch)

	On Error Resume Next

	intPID = objNextObject.TargetInstance.ProcessID
	strPath = objNextObject.TargetInstance.ExecutablePath
	WScript.Sleep intJP2KillDelay * 1000

	Rem Check that process is still running but can't assume the PID has not been reused
	strWQL = "SELECT * FROM Win32_Process WHERE ProcessID = " & intPID
	Set colProcesses = objSWbemServices.ExecQuery(strWQL,, wbemFlagReturnWhenComplete)
	If colProcesses.Count = 0 Then
		rem Already closed
		Exit Sub
	End If
	For Each objProcess In colProcesses
		Rem Will only ever be one match with a given PID!
		If objProcess.ExecutablePath <> strPath Then
			rem Is a different process
			Exit Sub
		End If
	Next

	objNextObject.TargetInstance.Terminate
End Sub

The extra code watches for the creation of a process called JP2Launcher.exe and then kills it after a short delay.  For a comprehensive explanation of how this works, I direct you to this excellent article here.

Firstly, an SWbemSink object is created to determine what code is called when events we’re interested in are raised.  You’ll see I specify the prefix “SINK_” that is to be used in the names of the subroutines called:

Set objWMISink = WScript.CreateObject("WbemScripting.SWbemSink","SINK_")

Next I construct a WQL query that every 3 seconds, looks to see if an event has been raised for the creation of a new instance of a Win32_Process whose name is JP2Launcher.exe:

strWQL = "SELECT * FROM __InstanceCreationEvent WITHIN 3 WHERE TargetInstance ISA 'Win32_Process' AND TargetInstance.Name = 'JP2Launcher.exe'"

Given that description, you can work out how to alter the syntax of that query to meet your requirements.  The query and the Sink object are then passed as parameters to a special WMI call called an Asynchronous (i.e. Runs in the background) Notification Query:

objSWbemServices.ExecNotificationQueryAsync objWMISink, strWQL

If and when a matching process is instantiated, this generates an event known as “OnObjectReady” and this, along with the prefix I specified earlier, causes the sink object to call the subroutine SINK_OnObjectReady.

Note the syntax for getting at the properties of the new Win32_Process from inside that subroutine:

intPID = objNextObject.TargetInstance.ProcessID
strPath = objNextObject.TargetInstance.ExecutablePath

After a short delay (in case there are circumstances where this process should legitimately appear and then soon disappear during uninstall), the process is killed by calling its Terminate method:

objNextObject.TargetInstance.Terminate

You’ll see in the code I’ve added in an extra check first to see if the process with the same ProcessID still exists and whether it’s pointing at the same executable before I kill it.  This is in case the process had closed and then by chance a new process had been created with the same ID.  I suspect that even if this were the case, that the call to Terminate would just throw an error as the original Process object would be gone and it wouldn’t try and touch the new one, but since I can’t really test this, I’m just being careful!

One last thing to note is that the WMI object used has to have Debug privileges to be able to kill processes launched under a different user context:

Set objSWbemServices = GetObject("winmgmts:{impersonationLevel=impersonate,(Debug)}!\\.\root\cimv2")

Automated Java Uninstall

Tags

,

I’ve recently had to face the thorny issue of upgrading Java in our environment and wanting to be able to do this remotely and silently.  The main problem was working out how to remove the existing version(s) first.

There are MANY scripts online that offer to do this, ranging from huge BAT files to short PowerShell scripts.  There was one particular solution I looked at that was a mammoth batch file which looked really promising and incredibly thorough.  I went through it line by line and then I came across lines like the following that do the uninstall:

wmic.exe product where filter clause call uninstall /nointeractive

I would assume that “product” is the alias for Win32_Product and I’ve read many articles (e.g. This one) about how you should not query that class as it triggers a repair of all your MSIs!  I’ve seen that happen when I tried to use that class in the past and sometimes it was not pleasant and broke things.  I decided to roll my own script instead.

Our environment is such that I can’t use PowerShell [on enough of our kit] and so I’ve gone for VBScript.  It’s not designed to be able to remove all possible versions, but removes the ones we have scattered around.  As long as it can be uninstalled by MsiExec and is labelled under Programs & Features with a name that matches “*Java*Update*”, then this ought to remove it.  Use entirely at your own risk!  I hope you find it helpful.

rem Remove all versions of Java x86 and x64

Const HKEY_LOCAL_MACHINE = &H80000002
Const WINDOW_HIDDEN = 0
Const WAIT_ON_RETURN = True

Set objWshShell = WScript.CreateObject("WScript.Shell")
Set objStdReg = GetObject("winmgmts:{impersonationLevel=impersonate}!\\.\root\default:StdRegProv")

For i = 1 To 2
	If i = 1 Then
		strKeyPath = "Software\Microsoft\Windows\CurrentVersion\Uninstall"
	Else
		strKeyPath = "Software\Wow6432Node\Microsoft\Windows\CurrentVersion\Uninstall"
	End If

	objStdReg.EnumKey HKEY_LOCAL_MACHINE, strKeyPath, arrSubKeys
	If Not IsNull(arrSubKeys) Then
		For Each strSubKey In arrSubKeys
			Rem Ensure is a GUID key
			If Left(strSubKey, 1) = "{" Then
				strSubKeyPath = strKeyPath & "\" & strSubKey
				objStdReg.GetStringValue HKEY_LOCAL_MACHINE, strSubKeyPath, "DisplayName", strDisplayName
				If Not IsNull(strDisplayName) Then
					intJavaIndex = InStr(LCase(strDisplayName), "java")
					If intJavaIndex > 0 Then
						intUpdateIndex = InStr(LCase(strDisplayName), "update")
						rem Effectively make the check to be for "*java*update*"
						If intUpdateIndex > intJavaIndex Then
							strCmd = "MsiExec.exe /X " & strSubKey & " /quiet /norestart"
							intRC = objWshShell.Run(strCmd, WINDOW_HIDDEN, WAIT_ON_RETURN)
						End If
					End If
				End If
			End If
		Next
	End If
Next

WScript.Quit